◀
◀
📚 目录
展开全部
折叠全部
▶
入门
简介
安装
1.x升级指南
版本升级
快速开始
开发前必读
主题与颜色
静态资源
视图与自定义页面
多应用(多后台)
JS组件
常见问题
Laravel Octane
▶
数据表格
基本使用
列的使用和扩展
列的显示和扩展
行的使用和扩展
工具栏
树状表格
组合表头
数据来源以及查询条件
关联关系
查询过滤
列过滤器
快捷搜索
规格筛选器
数据导出
快捷创建
行内编辑
事件
字段翻译
数据软删除
头部和脚部
表格异步渲染
▶
数据表单
基本使用
图片/文件上传
字段的使用
字段扩展
数据源
表单弹窗
关联关系
JSON表单
分步表单
表单验证
工具表单
事件以及表单响应
初始化
表单布局
字段翻译
字段动态显示
▶
数据详情
基本使用
字段显示
关联关系
字段显示扩展
初始化
字段翻译
▶
模型树
基本使用
▶
数据仓库
基本使用
▶
动作
基本使用
数据表格
数据表单
数据详情
模型树
▶
多语言
基本使用
▶
开发扩展
扩展基本使用
开发扩展
▶
页面组件
异步加载
图表
数据统计卡片
模态窗(Modal)
工具表单
下拉菜单
单/复选框
选项卡
警告框
提示窗
Markdown
卡片
▶
区块
区块基本使用
▶
动作以及表单响应
动作以及表单响应
▶
权限控制
权限控制
▶
菜单
菜单基本使用
▶
帮助函数
帮助函数
▶
开发工具
基本使用
▶
自定义登陆认证
自定义登录
▶
自定义头部导航
自定义头部导航条
▶
更新日志
BETA版本更新日志
更新日志
📖 内容导航
1.x
2.x
开发前必读
创建时间:2024-06-26 10:07:45 / 更新时间:2024-06-26 10:07:45
# 开发前必读 ## 开发环境请打开debug模式 `Dcat Admin`提供一些开发工具(如代码生成器)需要在 `debug` 模式下才能使用。 建议开发者在开发环境打开`debug`模式,把`.env`配置文件中的参数`APP_DEBUG`值设置为`true`即可。 ## 按需引入JS脚本 `Dcat Admin` 使用 `jquery-pjax` 构建无刷新页面(单页应用),并且支持<b>按需加载</b> `JS` 脚本,支持在任意的页面方法(模板文件除外)中引入`JS`脚本,每个页面只需加载当前页面所需要使用到的 `js` 脚本。 示例: 写一个自定义页面,这个页面组件需要引入一些前端静态资源文件 > {tip} `Dcat Admin`构建的是一个单页应用,加载的`JS`脚本只会执行一次,所以初始化操作不能直接放在`JS`脚本中,应该使用`Admin::script`方法载入。 ```php <?php use Illuminate\Contracts\Support\Renderable; use Dcat\Admin\Admin; class Card implements Renderable { public static $js = [ // js脚本不能直接包含初始化操作,否则页面刷新后无效 'xxx/js/card.min.js', ]; public static $css = [ 'xxx/css/card.min.css', ]; public function script() { return <<<JS console.log('所有JS脚本都加载完了'); // 初始化操作 $('xxx').card(); JS; } public function render() { // 在这里可以引入你的js或css文件 Admin::js(static::$js); Admin::css(static::$css); // 需要在页面执行的JS代码,例如初始化代码 // 通过 Admin::script 设置的JS代码会自动在所有JS脚本都加载完毕后执行 Admin::script($this->script()); return view('...')->render(); } } ``` 在控制器中使用这个组件 ```php use Dcat\Admin\Layout\Content; use Card; class HomeController { public function index(Content $content) { // 使用上面的Card组件 // Card组件需要用到的静态文件只会在当前请求加载 // 其他请求不会加载 return $content->body(new Card()); } } ``` ## 在页面中添加JS代码 由于加入了页面按需加载`JS`脚本的功能,所以在本项目内添加的`JS`代码都必须使用`Dcat.ready`方法监听`JS`脚本加载完毕事件,在此事件内的`JS`代码会在所有`JS`脚本都加载完毕后才执行。 使用 `Dcat\Admin\Admin::script` 方法添加的代码会自动放在`Dcat.ready`方法内执行。 ```php <?php use Dcat\Admin\Admin; use Dcat\Admin\Layout\Content; class UserController { public function index(Content $content) { Admin::script( <<<JS (function () { // 如果有定义局部变量的需求,最好放在匿名函数内,防止变量污染 var name = 'test'; console.log('所有JS脚本都加载完毕啦~~', name) })() JS ); return $content->header(...)->body(...); } } ``` 如果是在模板文件中添加`JS`代码,则需要把代码放在`Dcat.ready`内执行 ```html <script> // 用 Dcat.ready() 代替 $() // 此方法会在所有 js 脚本加载完成后执行 Dcat.ready(function () { // 写入你的 js 代码 console.log('所有 js 脚本加载完毕啦~~'); }); </script> ``` ## 页面内容和布局 > {tip} 页面内容的布局功能是`Dcat Admin`的基石,掌握了这个功能的用法,可以非常轻松的使用`Dcat Admin`构建页面或扩展功能,请大家一定要认真阅读。 `Dcat Admin`的布局可参考后台首页的布局文件`app/Admin/Controllers/HomeController.php`的`index()`方法。 `Dcat\Admin\Layout\Content`类用来实现内容区的布局。`Content::body($content)`方法用来添加页面内容。 一个简单的后台页面代码如下: ```php use Dcat\Admin\Layout\Content; public function index(Content $content) { // 选填 $content->header('填写页面头标题'); // 选填 $content->description('填写页面描述小标题'); // 添加面包屑导航 $content->breadcrumb( ['text' => '首页', 'url' => '/admin'], ['text' => '用户管理', 'url' => '/admin/users'], ['text' => '编辑用户'] ); // 填充页面body部分,这里可以填入任何可被渲染的对象 return $content->body('hello world'); } ``` 其中 `$content->body()` 方法是 `$content->row()` 的别名方法,可以接受任何可字符串化的对象作为参数,可以是字符串、数字、包含了`__toString`方法的对象,实现了`Renderable`、`Htmlable`接口的对象,包括laravel的视图。 ### 布局 `dcat-admin`的布局使用bootstrap的栅格系统,每行的长度是12,下面是几个简单的示例: 添加一行内容: ```php $content->row('hello') --------------------------------- |hello | | | | | | | | | | | --------------------------------- ``` 行内添加多列: ```php $content->row(function(Row $row) { $row->column(4, 'foo'); $row->column(4, 'bar'); $row->column(4, 'baz'); }); ---------------------------------- |foo |bar |baz | | | | | | | | | | | | | | | | | | | | | ---------------------------------- $content->row(function(Row $row) { $row->column(4, 'foo'); $row->column(8, 'bar'); }); ---------------------------------- |foo |bar | | | | | | | | | | | | | | | | ---------------------------------- ``` 列中添加行: ```php $content->row(function (Row $row) { $row->column(4, 'xxx'); $row->column(8, function (Column $column) { $column->row('111'); $column->row('222'); $column->row('333'); }); }); ---------------------------------- |xxx |111 | | |---------------------| | |222 | | |---------------------| | |333 | | | | ---------------------------------- ``` 列中添加行, 行内再添加列: ```php $content->row(function (Row $row) { $row->column(4, 'xxx'); $row->column(8, function (Column $column) { $column->row('111'); $column->row('222'); $column->row(function(Row $row) { $row->column(6, '444'); $row->column(6, '555'); }); }); }); ---------------------------------- |xxx |111 | | |---------------------| | |222 | | |---------------------| | |444 |555 | | | | | ---------------------------------- ``` #### 等宽布局 当列宽度设置为`0`时会使用等宽布局 ```php use Dcat\Admin\Layout\Row; use Dcat\Admin\Layout\Content; return Content::make() ->body(function (Row $row) { $row->column(0, 'foo'); $row->column(0, 'bar'); $row->column(0, 'baz'); }); ---------------------------------- |foo |bar |baz | | | | | | | | | | | | | | | | | | | | | ---------------------------------- ``` #### no-gutters `.row`上带有`margin-left: -15px;margin-right: -15px;`属性,你可以在`.row`上上定义`.no-gutters`属性,从而消除这个属性,使页面不会额外宽出`30px`,即`<div class="row no-gutters"...` ```php $content->row(function (Row $row) { // 启用 no-gutters $row->noGutters(); $row->column(9, function (Column $column) { $column->row($this->card(['col-md-12', 20], '#4DB6AC')); $column->row(function (Row $row) { // 启用 no-gutters $row->noGutters(); $row->column(4, $this->card(['col-md-4', 30], '#80CBC4')); $row->column(4, $this->card(['col-md-4', 30], '#4DB6AC')); $row->column(4, function (Column $column) { $column->row(function (Row $row) { // 启用 no-gutters $row->noGutters(); $row->column(6, $this->card(['col-md-6', 30], '#26A69A')); $row->column(6, $this->card(['col-md-6', 30], '#26A69A')); }); }); }); }); }); ``` 效果如下 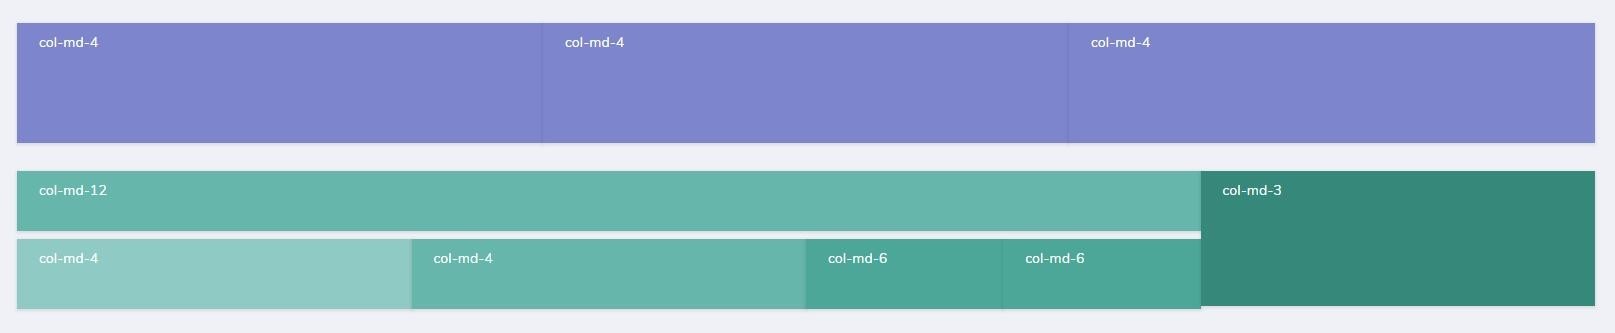 ### 构建无菜单栏页面 (full) 通过以上方法构建的页面默认是带有左边菜单栏和顶部导航栏的, 但有时候我们会需要构建一个没有菜单栏和顶部导航栏的完整页面,如登陆页面,或需要在IFRAME中加载的页面等等。 这时候就可以用 `Content::full` 这个方法了,调用了此方法后渲染出来的页面是不带菜单栏和顶部导航栏的,并且还可以使用 `Dcat Admin` 中的所有的功能和组件的,可以显著地提高效率。 下面将通过登录页的实现来演示此功能的用法 控制器 ```php use Dcat\Admin\Layout\Content; class AuthController extends Controller { public function getLogin(Content $content) { if ($this->guard()->check()) { return redirect($this->redirectPath()); } // 使用full方法构建登陆页面 return $content->full()->body(view($this->view)); } ... } ``` 下面是登陆功能的模板内容,因为控制器中使用了`Content::full`方法构建页面,所以不需要在模板中写`head`,也不需要关心引入哪些静态资源,只需写当前页面的HTML即可,并且还可以使用`Dcat Admin`中的所有功能,如下面用到的表单提交功能。 ```html <style> html body {background: #fff;} </style> <link rel="stylesheet" href="{{ admin_asset('@admin/css/pages/authentication.css') }}"> <section class="row flexbox-container"> <!-- 这里是你的登陆页面HTML代码 --> ... </section> <script> Dcat.ready(function () { // ajax表单提交 $('#login-form').form({ validate: true, }); }); </script> ``` 这个登陆页面使用了`ajax`表单提交功能,并且附带了按钮`loading`效果,比原来的登陆功能用户体验更好,大家可以[点这里体验](http://103.39.211.179:8080/admin/auth/login)。 ### 事件 系统会在`Dcat\Admin\Layout\Content`类被实例化时和`render()`方法被调用时触发以下两个事件,开发者可以在这两个事件中改变或添加一些行为。 #### 实例化 (resolving) 通过`Content::resolving`方法设置的回调函数会在`Dcat\Admin\Layout\Content`类被实例化时触发; ```php use Dcat\Admin\Layout\Content; Content::resolving(function (Content $content) { $content->view('app.admin.content'); }); ``` #### 构建页面 (composing) 通过`Content::composing`方法设置的回调函数会在`Dcat\Admin\Layout\Content::render`方法被调用时触发; ```php use Dcat\Admin\Layout\Content; Content::composing(function (Content $content) { $content->view('app.admin.content'); }); ``` #### 构建完成 (composed) 通过`Content::composed`方法设置的回调函数会在所有通过`Content::row`或`Content::body`方法设置的内容都构建完毕后触发。 ```php use Dcat\Admin\Layout\Content; class IndexController { public function index(Content $content) { Content::composed(function (Content $content) { // Grid已执行render方法 }); return $content->body(function ($row) { $grid = new Grid(...); ... $row->column(12, $grid); }); } } ``` <a name="admincontroller"></a> ## AdminController 通过上面页面布局的相关内容的学习,我们明白了`Dcat Admin`的页面组成构建的方法,那么一个增删改查功能究竟是怎么实现的呢?我们可以看到一个由代码生成器生成的增删改查控制器代码大概如下所示 ```php use App\Admin\Repositories\User; use Dcat\Admin\Form; use Dcat\Admin\Grid; use Dcat\Admin\Show; use Dcat\Admin\Http\Controllers\AdminController; class UserController extends AdminController { // 数据表格 protected function grid() { return Grid::make(new User(), function (Grid $grid) { ... }); } // 数据详情 protected function detail($id) { return Show::make($id, new User(), function (Show $show) { ... }); } // 表单 protected function form() { return Form::make(new User(), function (Form $form) { ... }); } } ``` 上面的代码主要包含了`grid`、`detail`和`form`,从这些代码中,我们并没有办法改变一个页面的布局,那这个页面究竟是怎么构建的?我们又如何更改页面的布局?我们不妨打开`AdminController`看一看 ```php <?php namespace Dcat\Admin\Controllers; use Dcat\Admin\Layout\Content; use Illuminate\Routing\Controller; class AdminController extends Controller { // 页面标题 protected $title; // 页面描述信息 protected $description = [ // 'index' => 'Index', // 'show' => 'Show', // 'edit' => 'Edit', // 'create' => 'Create', ]; // 指定语言包名称,默认与当前控制器名称相对应 protected $translation; // 返回页面标题 protected function title() { return $this->title ?: admin_trans_label(); } // 返回描述信息 protected function description() { return $this->description; } // 列表页 public function index(Content $content) { return $content ->title($this->title()) ->description($this->description()['index'] ?? trans('admin.list')) ->body($this->grid()); } // 详情页 public function show($id, Content $content) { return $content ->title($this->title()) ->description($this->description()['show'] ?? trans('admin.show')) ->body($this->detail($id)); } // 编辑页 public function edit($id, Content $content) { return $content ->title($this->title()) ->description($this->description()['edit'] ?? trans('admin.edit')) ->body($this->form()->edit($id)); } // 新增页 public function create(Content $content) { return $content ->title($this->title()) ->description($this->description()['create'] ?? trans('admin.create')) ->body($this->form()); } // 修改接口 public function update($id) { return $this->form()->update($id); } // 新增接口 public function store() { return $this->form()->store(); } // 删除/批量删除接口 public function destroy($id) { return $this->form()->destroy($id); } } ``` 现在是不是就可以明白整个页面的组成部分了呢?其实系统内很多代码都是见名知意、简单易懂的,很多时候我们只需要通过阅读代码就可以知道用法。 例如我们要更改页面标题,通过阅读这段代码,就可以得知可以通过重写`title`方法或更改翻译文件的方式实现,是不是非常简单? 下面我们通过实现一个数据表格 + 数据统计卡片的列表页面,来演示一下更改页面布局的实际应用 ```php use App\Admin\Metrics\Examples\NewDevices; use App\Admin\Metrics\Examples\NewUsers; use App\Admin\Metrics\Examples\TotalUsers; use Dcat\Admin\Layout\Content; use Dcat\Admin\Layout\Row; public function index(Content $content) { return $content ->title($this->title()) ->description($this->description()['index'] ?? trans('admin.list')) ->body(function (Row $row) { $row->column(4, new TotalUsers()); $row->column(4, new NewUsers()); $row->column(4, new NewDevices()); }) ->body($this->grid()); } ``` 实现效果如下  <a name="bootstrap-styles"></a> ## Bootstrap4公共样式 `Dcat Admin`采用`bootstrap4`的栅格系统对页面进行布局,既简单又强大,开始开发前需要对此有所了解,另外`bootsrap4`提供了非常多非常有用的[公共样式](https://getbootstrap.net/docs/utilities/borders/),对编写页面组件非常有帮助,能显著提高开发效率,建议编写组件前先查阅一遍文档,以下是推荐学习的样式列表: - [栅格布局](https://getbootstrap.net/docs/layout/grid/) - [Display显示属性](https://getbootstrap.net/docs/utilities/display/) 通过我们的显示实用程序,可以快速、有效地切换组件的显示值和更多,包括对一些更常见的值的支持,此样式列表对响应式布局非常有帮助。 - [flex弹性布局](https://getbootstrap.net/docs/utilities/flex/) 引入新的Flex弹性布局,可以实现通过一整套响应灵活的实用程序,快速管理栅格的列、导航、组件等的布局、对齐和大小。通过进一度的定义CSS,还可以实现更复杂的展示样式。 - [颜色(Color)](https://getbootstrap.net/docs/utilities/colors/) 通过颜色传达意义、表达不同的模块,这有一系列的定义方法,包括支持链接、悬停、选中等状态相关的的样式集。 - [Float浮动属性](https://getbootstrap.net/docs/utilities/float/) 使用我们的响应式float浮动通用样式,能在任何设备断点(浏览器尺寸)上切换浮动。 - [规格(sizi)](https://getbootstrap.net/docs/utilities/sizing/) 使用系统宽度和高度样式,轻松地定义任何元素的宽或高(相对于其父级) - [间隔(spacing)](https://getbootstrap.net/docs/utilities/spacing/) 内置了各种的快速缩进、隔离、填充等间距处理工具,响应余量和填充实用程序类来修改元素的外观。 - [文本处理](https://getbootstrap.net/docs/utilities/text/) 用于控制文本的对齐、组合、字重等示例以及使用文档。 - [垂直对齐(vertical align)](https://getbootstrap.net/docs/utilities/vertical-align/) 轻松更改内联、内嵌块、内联表和表格单元格元素的垂直对齐方式。 ### 内置样式 除了前面提到的[`bootstrap4`公共样式](https://getbootstrap.net/docs/utilities/borders/),系统还内置了以下常用样式: #### 颜色 请参考[颜色表样式](https://learnku.com/docs/dcat-admin/2.x/theme-and-color/8085#f8e56e) #### 阴影 <style> .shadow-item { width:120px;height:100px;line-height:100px;margin:5px 10px;display:inline-block;text-align:center; } </style> <div class="shadow-item" style="box-shadow:0 2px 4px 0 rgba(0,0,0,.08);"> <code>.shadow</code> </div> <div class="shadow-item" style="box-shadow:0 3px 1px -2px rgba(0,0,0,.05), 0 2px 2px 0 rgba(0,0,0,.05), 0 1px 5px 1px rgba(0,0,0,.05);"> <code>.shadow-100</code> </div> <div class="shadow-item" style="box-shadow:0 3px 1px -2px rgba(0,0,0,.1), 0 2px 2px 0 rgba(0,0,0,.1), 0 1px 5px 1px rgba(0,0,0,.1)"> <code>.shadow-200</code> </div>
上一文章
下一文章
返回顶部
返回主页
返回文档展示页